We will cover how to create a dynamic name range table in Excel. If you have ever created a list in Excel, it is frustrating if that list is not dynamic.
Overview
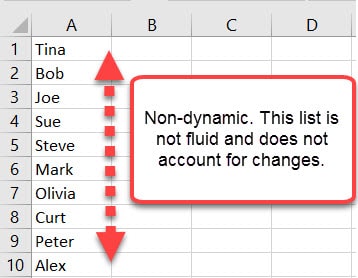
To begin, let’s define what it means for a list to be dynamic. A dynamic range automatically incorporates any new additions or deletions from a set list. Say you have a list of 10 students in a class. This class list has a non-dynamic named range “Classlist” from cells A1-A10. Let’s just assume a new student is added to the class. The named range “Classlist” is no longer accurate. It is still only looking at cells A1-10. However, the dynamic name list will automatically account for the new students.
Creating a Dynamic Name Range
So how do we create a dynamic range?
In order to create a dynamic name range, we must create a data table.
Create a Table
- Create a list in Excel with a Header. Our header is “Students”
- On the Ribbon’s Insert tab, click Table
- The range should default, but check to make sure it is correct. Do NOT include the header title.
- Ensure “My Table Has Headers” is checked
- Click OK, to create the table.
Setting up and using a Dynamic Name Range in Excel
For a refresher name ranges in Excel, refer back to Named Ranges in Excel – Setup, Rules, and Uses.
Now that we have the table setup, we must name the individual table columns. This is easily done as shown in the video above. Once these columns are named, we are able to use the names in our formulas.
=sum(Ages)
=average(Weight)